
Picture 1: My server.
On these page I describe how I did setup my own home server connected to the internet via FTTH. I use this server as personal e-mail and web server. It contains a fanless motherboard only. It boots and runs from a 64 GB USB flash drive, avoiding the need for an internal harddisk. The serial port is used as console, avoiding the use of a monitor.
This is my third server, which I installed in 2025. Click here for the description of how I did install my second server in 2007, which used a fanless motherboard that booted from a USB flash drive as well. And click here for the description of how I did install my first server in 2003, which used a fanless computer equiped with a 40 GB harddisk and a CD-ROM drive.
Contents:
1. My Requirements
2. The Hardware
3. The Operating System
4. Serial Cable
5. My Network Configuration
6. Partitioning the Flash Drive
7. Installing CentOS 8 Linux
8. Installing the GRUB2 UEFI Boot Loader
9. Preparations for First Boot
10. First Boot
11. Making a Backup First
12. Additional Configuration and Installing Additional Components
13. Configuring Startup
14. Personal Fine Tuning of CentOS 8 Linux
15. Creating Additional User Accounts
16. Crontab
17. Telnet
18. FTP
19. DNS
20. E-Mail
21. Protecting E-Mail with SPF, DKIM and DMARC
22. Filtering Spam
23. Auto-Replying to E-Mail
24. Web Server
25. Web Usage Statistics
26. WebMail
27. Samba
28. Protection Against Brute Force Password Hacking
29. NAT Settings FTTH Modem
Glossary and Abbreviations
References
For my server I had the following requirements:
As hardware I have used a fanless industrial mini-computer with an Intel Celeron J4125 processor, 8GB DDR4 RAM, a 256GB SSD drive, 4 USB ports and 2 serial ports. The SSD drive I do not need, but I could not get it without.
It is a small 14x14x4cm box, which gets its power from a 12V DC input. It comes with an external 100-240V AC to 12V DC power adapter similar to the ones used with laptops.
For the network I use a TP Link UE306 USB 3.0 to gigabit ethernet adapter. Although the mini-computer has built-in ethernet ports I choose not to use them. Using an external ethernet adapter makes it easier to temporarily run the server from a laptop, by just plugging the USB flash drive with the OS and the ethernet addapter in a laptop.
I use one of the build-in serial ports as console. If one hase a computer withour serial ports one can use a USB to serial cable. I recommend using a cable with an FTDI chip. The FTDI chip is the most common one used in USB to serial cables, and is supported in the Linux kernel.
As boot drive I use a 64GB USB flash drive. It is recommended to buy a high-speed flash drive from a reputable manufacturer.
Picture 1: My server.
To setup the BIOS, I needed to connect a monitor and a keyboard. This is the only time the monitor and keyboard are needed. Operating the system can be done using the serial port. Installing the system onto the USB flash drive can be done from any (laptop) computer.
I configured the BIOS to boot from USB and to reboot automatically after a power failure. Secure boot must be disabled.
I not even considered Windows, since it is neither free nor well designed. Since I did want to have a free operating system, the choice was between one of the many Linux distributions and FreeBSD Unix. They are basically all variants of the same flavour.
I have chosen CentOS 8 Linux. CentOS is a freeware version of Red Hat Enterprise Linux. My previous servers were also running Linux versions origination from Red Hat. In 2025 CentOS 8 was already end-of-life. However in 2020 I installed a backup server in the cloud running CentOS 8, and I wanted to copy as much as possible from this installation. I think most of what is described below would also be valid for CentOS 9.
I used a DVD-DL disk titled "CentOS 8.2-2004 X86_64 everything", which I did download as an ISO file from the CentOS Download website. (Today it is no longer available since CentOS 8 is end-of-life.)
To connect my server to my laptop a cross-over cable is needed, connecting TXD of the server to RXD of the laptop, and RXD of the server to TXD of the laptop. The hardware handshake signals are looped back. Figure 1 shows the cable pinning.
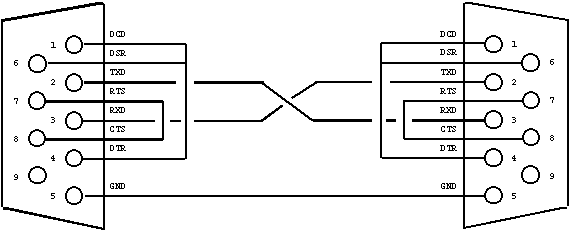
Figure 1: Serial cross-over cable.
I got a single public IPv4 address 77.174.241.175 from my internet provider. I got an IPv6 range 2a02:a466:5961/80 as well.
My home network is connected to the internet via an FritzBox FTTH modem. This modem provides Network Address Translation (NAT), Dynamic Host Configuration (DHCP) and a name server (DNS). It can connect to up to 4 ethernet devices via it's build-in hub.
My home network uses internal IP addresses, which can not be reached directly from the internet:
When IP packages pass through the FTTH modem, these internal IP addresses are translated into my public IP address and back. For traffic originating from my home network, the network address translator knows from which internal IP address the session originates. That way it is later able to send the response back to the right internal IP address.
For traffic originating from the internet, the network address translator has a table telling which protocols are handled by which internal IP address. If it receives an IP package of which the protocol is not listed in the table, they are discarded. By doing so it provides firewall functionality as a by-product of the network address translation.
For more information about Network Address Translation see Wikipedia [5].

Figure 2: My network configuration.
I have registered my own domain fwiarda.com at Network Solutions (see http://www.networksolutions.com/). Within this domain:
The name servers of Network Solutions are the name servers for my domain fwiarda.com.
To install CentOS 8 Linux on the USB flash drive regular Linux laptop or desktop computer is used. The server hardware is not needed for this.
Two partitions are created on the flash drive:
Note that I do not make a swap partition. Swapping to a flash drive is a bad idea, since flash memory can withstand only a limmited number of write cycles. Instead we have choosen to use an abundant 8GB of RAM, making swapping not necessary.
Check the device name of the flash drive before continuing! Using the wrong device name can erase the operating system from your computer! In the above it is assumed that the flash drive is /dev/sda. It could also be /dev/sdb or /dev/sdc, depending on other drives present in your computer.
First the USB flash drive is completely erased with the command (being careful to use the right device name):
dd if=/dev/zero of=/dev/sda bs=512000
The drive is now completely empty. I partition it using the more modern GUID Partition Table (GPT), instead of the older Master Boot Record (MBR) partition table. so the gdisk command is used instead of the older fdisk command:
gdisk /dev/sda
the gdisk program now prompts for input. the following commands are entered to the gdisk program:
n
p
(use default value)
+500mb
0700
n
2
(use default value)
+50g
8300
w
the newly created partition will be formatted and labeled with the following commands (being careful to use the right device name):
mkfs.vfat -F 32 -n FATBOOT /dev/sda1
mkfs.ext4 -L server:/ /dev/sda2
A regular laptop or desktop computer is booted from the DVD "CentOS 8.2-2004 X86_64 everything". The USB flash drive on which we want to install CentOS 8 Linux is inserted in this computer.
When CentOS 8 Linux boots up from the DVD it starts the Anaconda installer. The following choises are made in the Anaconda installer (again be carefull to select the right device to install to):
The GRUB2 the GRUB2 boot loader is installed by just copying file to the FATBOOT partition. Click here to download a copy of the GRUB2 UEFI boot loader. Unzip this file and copy the boot loader to /EFI/Boot/bootx64.efi. This is the default file UEFI will load at boot time.
A file /EFI/Boot/grub.cfg is created to contain the following lines:
set default=0
set timeout=2
set check_signatures=no

menuentry "Linux with Regular Serial Console" {
        linux /EFI/Linux/vmlinuz logo.nologo console=ttyS0,19200n8 ro root=LABEL=server:/
        initrd /EFI/Linux/initramfs.img
}
menuentry "Linux with USB Serial Console" {
        linux /EFI/Linux/vmlinuz logo.nologo console=ttyUSB0,19200n8 ro root=LABEL=server:/
        initrd /EFI/Linux/initramfs.img
}
menuentry "Linux with Video Display Console" {
        linux /EFI/Linux/vmlinuz logo.nologo ro root=LABEL=server:/
        initrd /EFI/Linux/initramfs.img
}
menuentry "Setup" {
        exit 0
}
menuentry "Power Off" {
        halt
}
The first entry Linux with Regular Serial Console is the default entry that is used normally. The second entry Linux with USB Serial Console shall be used when using USB to serial cable instead of a regular serial port. The line set default=0 can be changed to set default=1 to use this entry permanently. The third entry Linux with Video Display Console shall be used when a regular computer with a video screen as console is used. E.g. to debug the server.
Now the Linux kernel to be booted must be transfered to the FAT32 FATBOOT partition. This is done on a computer running Linux with the following commands:
md /tmp/server_fatboot
md /tmp/server_root
mount /dev/sda1 server_fatboot
mount /dev/sda2 server_root
cp /tmp/server_root/boot/vmlinuz-4.18.0-193.el8.x86_64 /tmp/fatboot/EFI/Linux/vmlinuz
cp /tmp/server_root/boot/initrd-4.18.0-193.el8.x86_64.img /tmp/fatboot/EFFI/Linux/initramfs.img
Now the USB flash drive is ready to be booted for the first time.
In the following it is asumed that the root filesystem is still mounted at /tmp/server_root as done in the previous section.
The file /tmp/server_root/etc/fstab is edited to contain the following lines:
LABEL=server:/             /                   ext4    defaults,noatime        1 1
LABEL=FATBOOT              /fatboot            vfat    defaults                0 0
Note the parameter noatime for the root filesystem. Since USB flash drives have a limitted number of write times, it is undesirable that every file read operation is logged, resulting in a write to disk.
At first boot the graphical user interface is started and we have to answer some questions. Because the target server hardware uses a serial console instead of a graphical display, the USB flash drive is booted the first time on the computer used to install it.
The USB flash drive is placed in the computer and we select it as UEFI boot device. At the boot screen we select:
Linux with Video Display Console
At the first boot screens we:
The USB flash drive is now put into the server. The server is connected with the serial cross-over cable to our Windows computer. On the windows computer we run a VT100 terminal emulation program (like Kermit 95). The serial port settings are 19200 baud, no-parity and 8 data bits. When the server is powered up it boots from the USB flash drive. We get the Linux login prompt at our terminal emulator.
Further configuration must be done while logged in as root.
To disable SELinux the file /etc/sysconfig/selinux is edited changing the following line:
SELINUX=disabled
To make the system boot without graphical user interface next time, the following commands are issued:
rm -f /etc/systemd/system/default.target
ln -s /usr/lib/systemd/system/multi-user.target /etc/systemd/system/default.target
The USB flash drive is now ready to bootup our server with it.
In the remainder of this page we do edit a lot of files. It is a good practice to make a
backup copy of the original file with a .old extension before editing.
The system configuration is basically determined by the files in the /etc tree. The whole
tree can be backed up to a file /root/etc.tar.gz with the command:
tar -zcf /root/etc.tar.gz /etc
And it can be restored again with the commands:
cd /
rm -rf /etc
tar -zxf /root/etc.tar.gz
We reboot the server and login as root.
A file /etc/sysconfig/network-scripts/ifcfg-enp0s21f0u2 is created with the network settings. I shall contain the following lines:
DEVICE=enp0s21f0u2
BOOTPROTO=static
IPADDR=10.0.0.254
DNS1=10.0.0.254
GATEWAY=10.0.0.138
NETMASK=255.0.0.0
IPV6ADDR=2a02:a466:5961:1::10.0.0.252/64
ONBOOT=yes
Note that the device name enp021f0u2 can change depending on the USB port the USB to ethernet connector is connected to. The right device name can be seen in the console messages when unplugging and replugging the ethernet addapter.
Because CentOS 8 is end-of-life the Yum repositories must be changes with the following commands:
sed -i 's/^mirrorlist/#mirrorlist/g' /etc/yum.repos.d/CentOS-*
sed -i 's|^#baseurl=http://mirror.centos.org|baseurl=http://vault.centos.org|g' /etc/yum.repos.d/CentOS-*
Some addtional packages are downloaded with the commands:
mkdir /root/rpms
yum --downloadonly --downloaddir=/root/rpms install epel-release
yum --downloadonly --downloaddir=/root/rpms install yum-utils
yum --downloadonly --downloaddir=/root/rpms install bind
yum --downloadonly --downloaddir=/root/rpms install clamav clamav-update
yum --downloadonly --downloaddir=/root/rpms install dos2unix
yum --downloadonly --downloaddir=/root/rpms install fail2ban
yum --downloadonly --downloaddir=/root/rpms install ftp
yum --downloadonly --downloaddir=/root/rpms install genwqe-zlib
yum --downloadonly --downloaddir=/root/rpms install GeoIP
yum --downloadonly --downloaddir=/root/rpms install iptables-services
yum --downloadonly --downloaddir=/root/rpms install ImageMagick
yum --downloadonly --downloaddir=/root/rpms install mailx
yum --downloadonly --downloaddir=/root/rpms install make
yum --downloadonly --downloaddir=/root/rpms install mod_ssl
yum --downloadonly --downloaddir=/root/rpms install opendkim
yum --downloadonly --downloaddir=/root/rpms install opendkim-tools
yum --downloadonly --downloaddir=/root/rpms install perl-CPAN
yum --downloadonly --downloaddir=/root/rpms install php
yum --downloadonly --downloaddir=/root/rpms install sendmail sendmail-cf
yum --downloadonly --downloaddir=/root/rpms install telnet
yum --downloadonly --downloaddir=/root/rpms install tmpwatch
yum --downloadonly --downloaddir=/root/rpms install xinetd telnet-server
yum --downloadonly --downloaddir=/root/rpms install wireguard-tools
yum --downloadonly --downloaddir=/root/rpms install ghostscript
The downloaded package files are installed with the command:
rpm -U /root/rpms/*
The following command is issued to make the real time clock use UTC time:
timedatectl set-local-rtc 0
The following commands deletes unnecessary startup files:
rm -rf /etc/systemd/user
rm -rf /etc/systemd/system/basic.target.wants
rm -rf /etc/systemd/system/bluetooth.target.wants
rm -rf /etc/systemd/system/graphical.target.wants
rm -rf /etc/systemd/system/nfs-blkmap.service.requires
rm -rf /etc/systemd/system/nfs-idmapd.service.requires
rm -rf /etc/systemd/system/nfs-mountd.service.requires
rm -rf /etc/systemd/system/nfs-server.service.requires
rm -rf /etc/systemd/system/nginx.service.d
rm -rf /etc/systemd/system/php-fmp.service.d
rm -rf /etc/systemd/system/remote-fs.target.wants
rm -rf /etc/systemd/system/rpc-gssd.service.requires
rm -rf /etc/systemd/system/rpc-statd-notify.service.requires
rm -rf /etc/systemd/system/rpc-statd.service.requires
rm -rf /etc/systemd/system/sysinit.target.wants
rm -rf /etc/systemd/system/sysstat.service.wants
rm -rf /etc/systemd/system/vmtoolsd.service.requires
rm -f /etc/systemd/system/dbus-org.bluez.service
rm -f /etc/systemd/system/dbus-org.fedoraproject.FirewallD1.service
rm -f /etc/systemd/system/dbus-org.freedesktop.Avahi.service
rm -f /etc/systemd/system/dbus-org.freedesktop.ModemManager1.service
rm -f /etc/systemd/system/dbus-org.freedesktop.nm-dispatcher.service
rm -f /etc/systemd/system/dbus-org.freedesktop.timedate1.service
rm -f /etc/systemd/system/display-manager.service
rm -f /etc/systemd/system/syslog.service
rm -f /etc/systemd/system/multi-user.target.wants/ModemManager.service
rm -f /etc/systemd/system/multi-user.target.wants/NetworkManager.service NetworkManager.service
rm -f /etc/systemd/system/multi-user.target.wants/abrt-ccpp.service
rm -f /etc/systemd/system/multi-user.target.wants/abrt-oops.service
rm -f /etc/systemd/system/multi-user.target.wants/abrt-vmcore.service
rm -f /etc/systemd/system/multi-user.target.wants/abrt-xorg.service
rm -f /etc/systemd/system/multi-user.target.wants/abrtd.service
rm -f /etc/systemd/system/multi-user.target.wants/atd.service
rm -f /etc/systemd/system/multi-user.target.wants/auditd.service
rm -f /etc/systemd/system/multi-user.target.wants/avahi-deamon.service
rm -f /etc/systemd/system/multi-user.target.wants/chronyd.service
rm -f /etc/systemd/system/multi-user.target.wants/dnf-makecache.timer
rm -f /etc/systemd/system/multi-user.target.wants/firewalld.service
rm -f /etc/systemd/system/multi-user.target.wants/kdump.service
rm -f /etc/systemd/system/multi-user.target.wants/ksm.service
rm -f /etc/systemd/system/multi-user.target.wants/ksmtuned.service
rm -f /etc/systemd/system/multi-user.target.wants/libstoragemgmt.service
rm -f /etc/systemd/system/multi-user.target.wants/libvirtd.service
rm -f /etc/systemd/system/multi-user.target.wants/mcelog.service
rm -f /etc/systemd/system/multi-user.target.wants/mdmonitor.service
rm -f /etc/systemd/system/multi-user.target.wants/named.service
rm -f /etc/systemd/system/multi-user.target.wants/nfs-client.service
rm -f /etc/systemd/system/multi-user.target.wants/pmcd.service
rm -f /etc/systemd/system/multi-user.target.wants/pmie.service
rm -f /etc/systemd/system/multi-user.target.wants/pmlogger.service
rm -f /etc/systemd/system/multi-user.target.wants/remote-fs.target
rm -f /etc/systemd/system/multi-user.target.wants/rhsmcert.service
rm -f /etc/systemd/system/multi-user.target.wants/rpcbind.service
rm -f /etc/systemd/system/multi-user.target.wants/smartd.service
rm -f /etc/systemd/system/multi-user.target.wants/smb.service
rm -f /etc/systemd/system/multi-user.target.wants/sssd.service
rm -f /etc/systemd/system/multi-user.target.wants/sysstat.service
rm -f /etc/systemd/system/multi-user.target.wants/tuned.service
rm -f /etc/systemd/system/multi-user.target.wants/vdo.service
rm -f /etc/systemd/system/multi-user.target.wants/vmtoolsd.service
rm -f /etc/systemd/system/multi-user.target.wants/xinetd.service
rm -f /etc/systemd/system/sockets.target.wants/avahi-deamon.socket
rm -f /etc/systemd/system/sockets.target.wants/pcscd.socket
rm -f /etc/systemd/system/sockets.target.wants/rcpbind.socket
rm -f /etc/systemd/system/sockets.target.wants/sssd-kcm.socket
To prevent some services that I have no clue about how and why they are started from being started, the follwing commands are executed:
ln -s /dev/null /etc/systemd/system/serial-getty@ttyS0.service
ln -s /dev/null /etc/systemd/system/serial-getty@ttyUSB0.service
ln -s /dev/null /etc/systemd/system/systemd-timedated.service
To determine which services are being started at startup, the directory "/etc/systemd/system/multi-user.target.wants" is filled with the following commands:
cd /etc/systemd/system/multi-user.target.wants
ln -s /usr/lib/systemd/system/crond.service crond.service
ln -s /usr/lib/systemd/system/dovecot.service dovecot.service
ln -s /usr/lib/systemd/system/fail2ban.service fail2ban.service
ln -s /usr/lib/systemd/system/httpd.service httpd.service
ln -s /usr/lib/systemd/system/irqbalance.service irqbalance.service
ln -s /usr/lib/systemd/system/named.service named.service
ln -s /usr/lib/systemd/system/ntfilter.service ntfilter.service
ln -s /usr/lib/systemd/system/rsyslog.service rsyslog.service
ln -s /usr/lib/systemd/system/saslauthd.service saslauthd.service
ln -s /usr/lib/systemd/system/sendmail.service sendmail.service
ln -s /usr/lib/systemd/system/smb.service smb.service
ln -s /usr/lib/systemd/system/sshd.service sshd.service
ln -s /usr/lib/systemd/system/vsftpd.service vsftpd.service
ln -s /usr/lib/systemd/system/xinetd.service xinetd.service
The file "/usr/lib/systemd/system/serial-getty@.service" is copied to "/etc/systemd/system/serial-getty-19200@.service". The following lines in this file are changed (to change set the baud rate to 19200):
Description=Modified Serial Getty on %I
ExecStart=-/sbin/agetty -o '-p -- \\u' 19200 %I $TERM
To determine where login prompts will apear, the directory "/etc/systemd/system/getty.target.wants" is filled with the following commands:
cd /etc/systemd/system/getty.target.wants
ln -s /lib/systemd/system/getty@.service getty@tty1.service
ln -s /etc/systemd/system/serial-getty-19200@.service serial-getty@ttyS0.service
ln -s /etc/systemd/system/serial-getty-19200@.service serial-getty@ttyUSB0.service
The first line starts a login prompt at the video display /dev/tty1. The second line starts a login prompt at the regular serial port /dev/ttyS0. The third line starts a login prompt at the first USB to serial interface /dev/ttyUSB0.
The changes in this section are fine tunings which are a matter of personal taste. The system will work fine without them.
The file /etc/bashrc is edited to contain the following lines:
# If we are an interactive shell and the terminal is an xterm,
# the environment variable PROMPT_COMMAND is set to manipulate
# the window title.
if [ "$PS1" ]; then
    case $TERM in
        xterm*)
                PROMPT_COMMAND='echo -ne "\033]0;${USER}@${HOSTNAME%%.*}:${PWD/#
$HOME/~}"; echo -ne "\007"'
                ;;
        *)
                PROMPT_COMMAND=''
            ;;
    esac
fi

# Set prompt.
PS1='\u@\h:\w \$ '

# Group and world do not get write permision on newly created files.
umask 022

# Define the equivalent of DOS commands as aliases.
alias cls="clear"
alias copy="cp -v"
alias del="rm"
alias dir="ls --color=never --time-style=long-iso -p -l -L"
alias md="mkdir"
alias rd="rmdir"
alias ren="mv -i"

# These changes reflect my personal taste.
alias info="info --vi-keys"
alias l.="ls --color=never --time-style=long-iso -p -a"
alias ll="ls --color=never --time-style=long-iso -p -l"
alias ls="ls --color=never --time-style=long-iso -p"
alias vi="/bin/vi"

# Stop bash offering to install packages.
unset command_not_found_handle
The following lines are added to /etc/profile:
# A VT100 is a subset of of the ansi definition and more reliable.
if [ $TERM = ansi ] ; then TERM=vt100 ; fi
export TERM

# Define keys for command line editing. Note that ^H is
# actually the backspace character.
if [ "$TERM" != "xterm" -a "$TERM" != "linux" -a "$TERM" != "cygwin" ] ; then
	stty erase ^H
fi
bind -f /etc/inputrc

# Get rid of strange (UTF8) characters in man pages and have ISO date
# formats.
LANG=en_DK
export LANG

# Define the prompt to be "user@host:directory $".
PS1='\u@\h:\w \$ '
export PS1

# Path to search for executables.
PATH=/usr/local/sbin:/usr/local/bin:/usr/sbin:/usr/bin:/bin
export PATH

# If it exists, add ~/bin to the path as well.
if [ -d ~/bin ] ; then
        PATH=~/bin:$PATH
fi

# Use the global vi preferences file.
EXINIT='so /etc/exrc'
export EXINIT

# Man shall look for man pages in /usr/local/share/man as well.
MANPATH=/usr/share/man:/usr/local/share/man
export MANPATH

# Login shells seem to fail to run ~/.bashrc, so we do it explicitly.
if [ -f ~/.bashrc ]; then
	. ~/.bashrc
fi
The files /etc/skel/.bashrc and /root/.bashrc shall contain the follwing lines:
# Source global definitions.
if [ -f /etc/bashrc ]; then
	. /etc/bashrc
fi

# User specific aliases and functions.
Existing profile files have been deleted using the following commands:
rm -f /etc/skel/.bash_profile
rm -f /root/.bash_profile
rm -f /home/*/.bash_profile
A global vi settings file /etc/exrc is created to contain the following lines:
# Autoindentation on.
set autoindent

# Color syntax off.
syn off
I like to have Windows XP style command line editing. To enable this the file /etc/inputrc must contain the following lines:
# Windows style command line editing.
set completion-ignore-case on
set mark-directories off
set match-hidden-files off

tab: menu-complete

del: delete-char
"\e[3~": delete-char
"\e[3;2~": delete-char
$if term=xterm
	del: backward-delete-char
$endif
$if term=linux
	del: backward-delete-char
$endif
control-h: backward-delete-char

# Re-mapping of some keys that where not mapped well.
"\e[5~": beginning-of-history
"\e[6~": end-of-history

# A VT100 does not have a Home, End, PgUp and PgDn key. In my
# terminal emulator I programmed the vi key sequences for these
# actions under the these keys.
"\e\C-u": beginning-of-history
"\e\C-d": end-of-history
"\e0": beginning-of-line
"\e$": end-of-line

"\e[5~": beginning-of-history
"\e\C-u": beginning-of-history

"\e[6~": end-of-history
"\e\C-d": end-of-history

"\e0": beginning-of-line

"\e$": end-of-line

"\e[1;5C": forward-word
"\e[5C": forward-word
"\e\e[C": forward-word

"\e[1;5D": backward-word
"\e[5D": backward-word
"\e\e[D": backward-word
The file /etc/mail.rc has been edited to contain the following lines:
# Ask for the mail subject when accepting mail from a terminal.
set asksub

# Terminate mail input with a line containing a single dot.
set dot

# Retain read messages in the system mailbox instead of moving them
# to the mbox file.
set hold

# Don't save a message to the file dead.letter when input of the message
# is aborted with ctrl-C.
set nosave

# Don't display Received headers.
ignore Received
Two additional user accounts are created.
The account server is used for administrative purposes, like storing the web pages with usage statistics.
The account fwiarda is my personal account. My personal web site is stored under this account. I do receive my personal e-mail on this account. I mount the home directory of this account as an additional drive on my PC.
Creating the additional accounts is done by issuing the following comands:
useradd server -c "Server Administration"
useradd fwiarda -c "Frits Wiarda"
chmod 755 /home/server
chmod 755 /home/fwiarda
passwd server
passwd fwiarda
Note that with the chmod commands I make users home directories readable for all. The default for CentOS 8 Linux is that users home directories are strictly private. I consider this not handy since my users are myself in different roles, and now and then perhaps a well trusted friend.
I create a link /home/root as an alias to the root's home directory. I make the root's home directory world readable as well. Issuing the following commands does this:
ln -s /root /home/root
chmod 755 /root
After installation the root mail is flooded with mail containing all kind of periodic reports. So I consider it desirable to clean all crontabs, and then add the things I consider useful.
Crontab is a feature which periodically executes certain tasks. There are two types of crontabs, user crontabs and system crontabs.
User crontabs are managed with the command crontab.
System crontabs are managed by editing the file /etc/crontab. By default this file contains 4 entries which periodically executes all executable files in the directories /etc/cron.hourly, /etc/cron.daily, /etc/cron.weekly, and /etc/cron.monthly. The file /etc/crontab is edited to contain the following lines:
SHELL=/bin/bash
PATH=/sbin:/bin:/usr/sbin:/usr/bin:/usr/local/sbin:/usr/local/bin
MAILTO=root
HOME=/root

0 * * * * root run-parts /etc/cron.hourly
10 0 * * * root run-parts /etc/cron.daily
20 0 * * 0 root run-parts /etc/cron.weekly
30 0 1 * * root run-parts /etc/cron.monthly
The directories containing the files to be executed periodically are cleaned with the following commands:
mv /etc/cron.hourly /etc/cron.hourly.old
mv /etc/cron.daily /etc/cron.daily.old
mv /etc/cron.weekly /etc/cron.weekly.old
mv /etc/cron.monthly /etc/cron.monthly.old
mkdir /etc/cron.hourly
mkdir /etc/cron.daily
mkdir /etc/cron.weekly
mkdir /etc/cron.monthly
A file /etc/cron.daily/cleanup has been created containing the
following
lines:
#!/bin/bash
/usr/sbin/tmpwatch -u -m -c -f 24 /tmp
/usr/sbin/tmpwatch -u -m -c -f 24 /var/spool/squirrelmail/attach

# The following service must be restarted to re-create subdirectory
# in "/tmp".
/bin/systemctl restart php-fpm.service
After editing, the permissions for this file have been changed with the command:
chmod 755 /etc/cron.daily/cleanup
For more information about crontabs see Wikipedia [6].
By default telnet is disabled on CentOS 8 Linux. To enable it edit the file /etc/xinetd.d/telnet and change disable = yes into disable = no. The change becomes effective after the xinet-daemon has been restarted, or after a system reboot.
By default CentOS 8 Linux disallows root login via telnet, since it is considered insecure because telnet uses unencrypted password verification. However on a home network behind a firewall security is not an issue. To enable root login via telnet add the following lines to the file /etc/securetty:
pts/0
pts/1
pts/2
  .
  .
pts/19
The following lines shall also be pressent to enable root login from the serial console:
ttyS0
ttyUSB0
By default CentOS 8 Linux disallows root login via FTP, since it is considered insecure because FTP uses unencrypted password verification. To change this the file /etc/vsftpd/ftpusers is edited. The entry root is removed.
To disable anonymous FTP, to enable ASCII transfers, to increase the idle session timeout, and to define the ports used for passive mode (which must be opened in my FTTH modem as well), the file /etc/vsftpd/vsftpd.conf has been edited changing or adding the following lines:
anonymous_enable=NO
ascii_upload_enable=YES
ascii_download_enable=YES
idle_session_timeout=3600
pasv_enable=YES
pasv_min_port=20000
pasv_max_port=20255
A directory /etc/named is created to store our zone files. I do not like the
CentOS 8 Linux default /var/named. Having all configuration files in the /etc tree makes
it easier to backup the servers configuration.
The root hints file /var/named/named.ca is copied to /etc/named/named.root. This file contains references to the internet's master name servers. It is advisable to check yearly for updates of this file at ftp://ftp.rs.internic.net/domain/.
For each domain for which we have the authority, we have to create a zone file resolving that domain.
Since my server is connected to the internet via a network address translating (NAT) FTTH modem, different IP addresses are needed to approach my server from the internet and from my home network. From the internet my server has to be approached with the public IP address 77.174.241.175 provided by my internet service provider. The FTTH modem translates this address into the internal IP address 10.0.0.254. If I approach my server from my internal home network, I have to use the internal IP address 10.0.0.254 directly.
My DNS returns an internal IP address to clients locally on my home network (e.g. my laptop). My DNS is the authorizing DNS for clients with local IP addresses only. Clients on the internet will be served by the DNS from my registrar Network Solutions. The settings with my registrar are outside the scope of this page. Registrars typically have their DNSs be configuered via a webpage. The data to be entered is simmilar to the data in our local DNS, with local IP addresses replaced by my public IP address.
Ofcause the above requires that I specify my own DNS server 10.0.0.254 as the prefered DNS in the network configuration of all my local clients. That can be done either by editing the network settings for each client, or by editing the settings for the DHCP server in the FTTH modem.
To cater for the above, the file /etc/named.conf must contain the following lines:
options {
	directory "/etc/named";
	max-cache-size 1m;
	listen-on {any; };
};

logging {
	category lame-servers { null; };
};

view "local" IN {
	match-clients { localnets; };
	recursion yes;
	zone "fwiarda.com." IN {
		type master;
		file "fwiarda.com.lzone";
	};
	zone "." IN {
		type hint;
		file "named.root";
	};
};$TTL 2h
@ IN SOA ns.fwiarda.com. fwiarda.xs4all.nl. (
1 ; serial
3h ; refresh
1h ; retry
1w ; expire
1h ) ; negative caching ttl
@ IN NS ns.fwiarda.com.
@ IN A 10.0.0.254
@ IN MX 0 mail.fwiarda.com.
@ IN TXT "v=spf1 a ~all"
default._domainkey.fwiarda.com. IN TXT "v=DKIM1; k=rsa; p=xxxxxxxxxxxxxxxxxxxxxxxxxxxxxxxx"
_dmarc.fwiarda.com. IN TXT "v=DMARC1; p=none; sp=none; pct=100"
ftp.fwiarda.com. IN A 10.0.0.254
mail.fwiarda.com. IN A 10.0.0.254
ns.fwiarda.com. IN A 10.0.0.254
pc.fwiarda.com. IN A 10.0.0.201
telnet.fwiarda.com. IN A 10.0.0.254
server.fwiarda.com. IN A 10.0.0.254
ssh.fwiarda.com. IN A 10.0.0.254
www.fwiarda.com. IN A 10.0.0.254
mail.fwiarda.com. IN MX 0 mail.fwiarda.com.
mail.fwiarda.com. IN TXT "v=spf1 a ~all"
In the above the xxxxxxxxxxxxxxxxxxxxxxxxxxxxxxxx has to be replaced by the real DKIM key, which for obvious reasons I am not publishing on the internet.
Note that I have not used my regular e-mail address fwiarda@fwiarda.com in the SOA record , but the e-mail address fwiarda@xs4a11.n1 (which is written in SOA format as fwiarda.xs4all.nl), which I got from my internet service provider XS4ALL. If there are problems with my name server or my domain, it is likely that my e-mail address is experiencing problems as well. Therefore I use my e-mail address fwiarda@xs4a11.n1 for things like domain registration and maintenance. Normally this address is forwarded to my regular e-mail address fwiarda@fwiarda.com, but when I am experiencing problems I can cancel this forward and use the fwiarda@xs4a11.n1 address to communicate with the helpdesk.
The changes in this section become effective after the named-daemon is started manually or after a system reboot.
For more information about DNS see the book titled "DNS and BIND" ([1]);
To speed up mail delivery I have edited the file /etc/sysconfig/sendmail, and changed SENDMAIL_OPTS="-q1h" into SENDMAIL_OPTS="-q10m". This change makes that the mail queue is processed every 10 minutes instead of every hour.
I have edited the file /etc/mail/sendmail.mc. to contain the following lines:
include(`/usr/share/sendmail-cf/m4/cf.m4')
OSTYPE(`linux')
VERSIONID(`linux setup for CentOS Linux')
define(`confAUTH_MECHANISMS',`GSSAPI DIGEST-MD5 CRAM-MD5 KERBEROS_V4 LOGIN PLAIN')
define(`confCW_FILE',`/etc/mail/local-host-names')
define(`confDOMAIN_NAME',`mail.fwiarda.com')
define(`confDONT_BLAME_SENDMAIL',`GroupWritableDirPathFile')
define(`confDONT_BLAME_SENDMAIL',`GroupWritableDirPathFileSafe')
define(`confDONT_BLAME_SENDMAIL',`GroupWritableForwardFile')
define(`confDONT_BLAME_SENDMAIL',`GroupWritableForwardFileSafe')
define(`confDONT_BLAME_SENDMAIL',`GroupWritableIncludeFile')
define(`confDONT_BLAME_SENDMAIL',`GroupWritableIncludeFileSafe')
define(`confDOUBLE_BOUNCE_ADDRESS',`null')
define(`confFORWARD_PATH',`$z/.forward')
define(`confMAX_MESSAGE_SIZE',`0')
define(`confPRIVACY_FLAGS',`noexpn,novrfy')
define(`ALIAS_FILE',`/etc/mail/aliases')
TRUST_AUTH_MECH(`GSSAPI DIGEST-MD5 CRAM-MD5 KERBEROS_V4 LOGIN PLAIN')
FEATURE(`accept_unresolvable_domains')
FEATURE(`allmasquerade')
FEATURE(`always_add_domain')
FEATURE(`limited_masquerade')
FEATURE(`masquerade_envelope')
FEATURE(`no_default_msa')
FEATURE(`use_cw_file')
FEATURE(`virtusertable',`hash /etc/mail/virtusertable.db')
MASQUERADE_AS(`mail.fwiarda.com')
MASQUERADE_DOMAIN(`server.fwiarda.com')
MAILER(`smtp')
dnl #
dnl # The parameter "M=S" defines sendmail sends mail without using TLS.
dnl #
CLIENT_OPTIONS(`Family=inet,M=S,Addr=0.0.0.0.')
dnl #
dnl # As long as I do not have IPv6 DNS records my mail can be classified
dnl # as spam when send via IPv6. Therefore the localhost address
dnl # "::1" is specified as sender address for IPv6, to prevent mail to
dnl # be send via IPv6.
dnl #
CLIENT_OPTIONS(`Family=inet6,M=S,Addr=::1')
dnl #
dnl # Sendmail by default listens on IPv4.
dnl # No DAEMON_OPTIONS are needed.
dnl #
dnl
dnl #
dnl # The following makes sendmail listens on IPv6 as well.
dnl #
DAEMON_OPTIONS(`Family=inet6,Port=smtp,Name=MTA6')
DAEMON_OPTIONS(`Family=inet6,Port=submission,Name=MSA6')
dnl #
dnl # Add DKIM signature to mails.
dnl #
INPUT_MAIL_FILTER(`opendkim',`S=inet:8891@localhost')
I have edited the file /etc/mail/submit.mc to contain the following lines:
include(`/usr/share/sendmail-cf/m4/cf.m4')
OSTYPE(`linux')
VERSIONID(`linux setup for CentOS Linux')
define(`confCF_VERSION',`Submit')
define(`confPID_FILE',`/var/run/sm-client.pid')
define(`confTIME_ZONE',`USE_TZ')
FEATURE(`msp',`[127.0.0.1]')
I have edited the file /etc/mail/local-host-names to contain the following lines:
server.fwiarda.com
mail.fwiarda.com
fwiarda.com
I have edited the file /etc/mail/aliases to contain the following lines:
adm: 			bounce
amanda: 		bounce
apache: 		bounce
bin: 			bounce
canna: 			bounce
desktop: 		bounce
ftp: 			bounce
games: 			bounce
gdm: 			bounce
gopher: 		bounce
halt: 			bounce
ident: 			bounce
ldap: 			bounce
lp: 			bounce
mail: 			bounce
mailman: 		bounce
mailnull: 		bounce
mysql: 			bounce
named: 			bounce
netdump: 		bounce
news: 			bounce
nfsnobody: 		bounce
nobody: 		bounce
nscd: 			bounce
ntp: 			bounce
pcap: 			bounce
postfix: 		bounce
postgres: 		bounce
privoxy: 		bounce
pvm: 			bounce
radvd: 			bounce
rpc: 			bounce
rpcuser: 		bounce
rpm: 			bounce
shutdown: 		bounce
smmsp: 			bounce
squid: 			bounce
sshd: 			bounce
sync: 			bounce
uucp: 			bounce
vcsa: 			bounce
webalizer: 		bounce
wnn: 			bounce
xfs: 			bounce

mailer-daemon: 		/dev/null
null: 			/dev/null
root: 			fwiarda

server 	        	bounce
I have edited the file /etc/mail/virtusertable to contain the following lines:
fwiarda@fwiarda.com		fwiarda
null@fwiarda.com		null
bounce@fwiarda.com		bounce
@fwiarda.com			error:5.1.6:550 Mail to fwiarda@fwiarda.com instead
When hosting additional e-mail domains, a tab-separated list of e-mail addresses and the local mailboxes or aliases on which they must be mapped must be added to the file /etc/mail/virtusertable. Leaving the part of the e-mail address before the @ sign away maps the entire domain. Note that all domains for which e-mail can be received must be listed in the file /etc/mail/local-host-names.
For more information about e-mail see the book titled "Sendmail" ([2]).
Nowadays it is common to protect e-mail against spoofing. Spammers offten spoof the sender address of an e-mail so the receiver thinks the mail is comming from a trusted person. Big e-mail providers like GMail refuse mail from which the sender cannot be authenticated.
SPF (Sender Policy Framework) is the easiest. In the DNS (Domain Name System) it is registered which IP addresses are allowed to send mail for that domain. Mail send from other IP addresses shall be considered illigitimate. SPF does not work if e-mail is forwarded from one account to another account. The recieving account sees the e-mail comming from the IP address of the mailserver of the forwarding account instead of from the sending mail server. For more information about SPF see Wikipedia [7].
DKIM (DomainKeys Identified Mail) is more complex. E-mail is signed with a secret key, while in the DNS the matching public key is registered. To add the DKIM signature to outgoing e-mail, extra software is needed to be installed, through which all outgoing e-mail is filtered. For more information about DKIM see Wikipedia [8].
DMARC (Domain-based Message Authentication, Reporting and Conformance) is an advisory protocol that tells how to treat e-mail failing SPF and/or DKIM. In the DNS a record is published advising how to treat e-mail failing SPF and/or DKIM. For more information about DKIM see Wikipedia [9].
I have inplemented SPF by registring an TXT record in the DNS for both my fwiarda.com domain and for my mail.fwiarda.com sub-domain containing the text "v=spf1 a ~all". It authorizes the IP address which is in the A-record for this domain to send e-mail. It advices a soft-fail for non matching IP addresses. A soft-fail means the e-mail is quarentined in the spam folder.
The following lines in the zone file fwiarda.com.lzone define the SPF records:
@                              IN  TXT   "v=spf1 a ~all"
mail.fwiarda.com.              IN  TXT   "v=spf1 a ~all"
In the DNS of my registrar Network Solutions I had to make similar changes.
I use opendkim as software to sign outgoing e-mail with a DKIM key. The file /etc/opendkim.comf is the configuratin file for opendkim. I have made the following changes to it:
# Only sign outgoing e-mail.
Mode                    s

# Define the socket throug which sendmail accesses opendkim.
Socket                  inet:8891@localhost

# No error reports.
SendReports             no

# Pointers to further configuration files. Note that refile: is used instead
of file: to allow for the use of wildcards in the files.
KeyTable                /etc/opendkim/KeyTable
SigningTable            refile:/etc/opendkim/SigningTable
ExternalIgnoreList      refile:/etc/opendkim/TrustedHosts
InternalHosts           refile:/etc/opendkim/TrustedHosts
The file /etc/opendkim/KeyTable shall contain the following lines:
default._domainkey.fwiarda.com fwiarda.com:default:/etc/opendkim/fwiarda.com.default.private
The file /etc/opendkim/SigningTable shall contain the following lines:
*@fwiarda.com default._domainkey.fwiarda.com
*@mail.fwiarda.com default._domainkey.fwiarda.com
*@server.fwiarda.com default._domainkey.fwiarda.com
The file /etc/opendkim/TrustedHosts shall only contain the IPv4 and IPv6 address of the localhost. So it shall contain the following lines:
127.0.0.1
::1
We generate the DKIM key pair with the following commands:
opendkim-genkey -a -d fwiarda.com
mv default.private /etc/opendkim/fwiarda.com.default.private
mv default.txt /etc/opendkim/fwiarda.com.txt_record
The file /etc/opendkim/fwiarda.com.default.private contains the private key that is used to sign outgoing e-mail. The file /etc/opendkim/fwiarda.com/txt_record comtains the DKIM record with the public key that has to be entered into the DNS. Note that everytime the keys are generated one gets a different key pair.
All files in the directory /etc/opendkim must be owned by the user opendkim and the group opendkim. They are not allowed to be world readable. If these conditions are not fulfilled opendkim will not start. To do so, the following commands are executed:
chown opendkim:opendkim /etc/opendkim/*
chmod 640 /etc/opendkim/*
The following line in the zone file fwiarda.com.lzone defines the DKIM record:
default._domainkey.fwiarda.com. IN TXT "v=DKIM1; k=rsa; p=xxxxxxxxxxxxxxxxxxxxxxxxxxxxxxxx"
Ofcause the xxxxxxxxxxxxxxxxxxxxxxxxxxxxxxxx has to be replaced by the real DKIM key, which for obvious reasons I am not publishing on the internet. This key can be found in the file /etc/opendkim/fwiarda.com.txt_record.
I do not want to loose any outgoing e-mails due to misconfiguration. Therefore I set DMARC to not enforcing SPF and/or DKIM.
The following line in the zone file fwiarda.com.lzone defines the DMARC record:
_dmarc.fwiarda.com. IN TXT "v=DMARC1; p=none; sp=none; pct=100"
I use spamassassin to tag spam for mail send to my personal mail account. My spamassassin configuration file /etc/mail/spamassassin/local.cf contains the following lines:
report_safe 0
add_header all Report "_REPORT_"
Besides the lines above, I have added some personal rules to the file /etc/mail/spamassassin/local.cf . These rules are outside the scope of this document.
I have created a file /etc/mail/spamassassin/whitelist.cf containing the e-mail addresses of my contacts in lines like:
whitelist_from user@domain
I have created a file /etc/mail/spamassassin/blacklist.cf containing the e-mail addresses of people from who I do not want to receive e-mail in lines like:
blacklist_from user@domain
I have written a procmail script which moves spam to a seperate mailbox ~/mail/Spam. The suspected spammer will receive a mail that his e-mail has been deleted. In this mail he is informed that he can bypass the spam filter by starting the subject field with the keyword NOSPAM. Real spammers do not read bounced messages. But legitimate senders whose mail is accidentally tagged as spam will do. Click here for a copy of the script. Beware DOS to Unix text file conversion (CR-LF to LF) when downloading it. The script is self ducmenting. Copy it to /usr/local/bin/spamfilter. The file must be executable for everybody. This can be done with the command:
chmod 755 /usr/local/bin/spamfilter
To have all my e-mail filtered, I have created a /home/fwiarda/.forward containing the following line:
"|/usr/local/bin/spamfilter email=fwiarda@fwiarda.com"
Note that sendmail requires the /home/fwiarda/.forward file to be owned by fwiarda and not being world readable. When the file has been created by root, the following commands fix this:
chmod 644 /home/fwiarda/.forward
chown fwiarda:fwiarda /home/fwiarda/.forward
For more information about spamassassin see Wikipedia [10].
CentOS 8 Linux does not come with a vacation program, to auto-reply to your mail. I have written a perl script myself, which mimics the Unix vacation program.
In most aspects this script is stripped down in functionality compared to the Unix vacation program. However, with the handling of .forward files it is more advanced. If a .forward file already exists and contains forwards to something else then vacation, it adds a line to the original .forward file instead of overwriting it. Later, when vacation is disabled, this line is deleted again. This behaviour leaves other forwards intact.
Click here for a copy of the script. Beware DOS to Unix text file conversion (CR-LF to LF) when downloading it. The script is self ducmenting. Copy it to /usr/local/bin/vacation. The file must be executable for everybody. This can be done with the command:
chmod 755 /usr/local/bin/vacation
The following lines must be added to or changed in the main server configuration section of /etc/httpd/conf/httpd.conf:
# Set my e-mail address as the server administrators e-mail.
ServerAdmin "fwiarda@fwiarda.com"

# Set the name of the server. An IP address is OK here.
ServerName "10.0.0.254"

# The following options are necessary for HTTPS.
SSLCertificateFile "/etc/pki/tls/certs/fwiarda.com.crt"
SSLCertificateKeyFile "/etc/pki/tls/private/fwiarda.com.key"

# Each directory to which Apache has access can be configured with respect
# to which services and features are allowed and/or disabled in that
# directory (and its subdirectories).
#
# We configure the default to be a very relaxed set of features,
# so we do not have to switch them on seperately for each virtual
# server.
<Directory "/">
	Options All
	AllowOverride All
	Order allow,deny
	Allow from all
</Directory>

# We set the documents defining a directory index.
<IfModule dir_module>
	DirectoryIndex "index.htm" "index.html" "index.txt" "index.cgi" "index.php"
</IfModule>

# We define the format of directory listings.
IndexOptions FancyIndexing NameWidth=* FoldersFirst SuppressDescription

# All files ending with .cgi are scripts, even if they are not placed
# in a special directory for cgi-scripts.
AddHandler cgi-script .cgi .pl .py

# We do not want .htaccess, .htpasswd and .htgroup files to be displayed.
<Files ~ "^\.ht">
	Order allow,deny
	Deny from all
</Files>

# We lookup the hostnames for the IP addresses to which
# we provide pages. This makes our log files more readable.
HostnameLookups On

# We set the error log file.
ErrorLog "/var/log/httpd/error_log"

# We set the access log file.
CustomLog "/var/log/httpd/access_log" combined

# Disable http://server.fwiarda.com/cgi-bin/ to be a server
# wide script directory.
#ScriptAlias /cgi-bin/ "/var/www/cgi-bin/"
These settings are valid for all virtual hosts. The following lines have been added to or changed in the virtual host section of /etc/httpd/conf/httpd.conf:
# We define we are going to use name based virtual hosts.
NameVirtualHost "*:80"

# This entry is the default entry for HTTP. It is used when the hostname
# in the URL is not known to us. Hackers just trying our IP address end up
# here. We will always return an empty page with mime-type text/plain. All
# settings for this entry are taken from the main server configuration
# section above.
<VirtualHost "*:80">
	<Directory "/dev">
		ForceType text/plain
	</Directory>
	AliasMatch ".*" "/dev/null"
	CustomLog "/var/log/httpd/access_log" combined
	ErrorLog "/var/log/httpd/error_log"
</VirtualHost>

# This entry is the entry used for all HTTPS connections. Because
# name based virtual hosts are not working for SSL connections we
# use a trick. We change "https://" in the URL into "http://"
# using mod_rewrite. Apache now internally forwards the HTTPS
# request to itself as an HTTP request.
<VirtualHost "*:443">
	SSLEngine on
	RewriteEngine On
	RewriteCond "%{HTTP_HOST}" "=mail.fwiarda.com" 		[ornext]
	RewriteCond "%{HTTP_HOST}" "=server.fwiarda.com" 	[ornext]
	RewriteCond "%{HTTP_HOST}" "=www.fwiarda.com" 		[ornext]
	RewriteCond "%{HTTP_HOST}" "=fwiarda.com"
	RewriteRule ".*" "http://%{HTTP_HOST}%{REQUEST_URI}" 	[proxy]
	<Directory "/dev">
		ForceType text/plain
	</Directory>
	AliasMatch ".*" "/dev/null"
	CustomLog "/var/log/httpd/ssl_access_log" combined
	ErrorLog "/var/log/httpd/ssl_error_log"
</VirtualHost>

# The entry for calls to http://mail.fwiarda.com/ . It accesses
# SquirrelMail, a web based mail client which is part of the Red Hat
# Linux 8.0 distribution. Since it is a web site on it's own,
# it has it's own error log and access log files.
<VirtualHost "*:80">
	ServerName "mail.fwiarda.com"
	DocumentRoot "/usr/local/share/squirrelmail"
	ErrorLog "/var/log/httpd/mail.fwiarda.com.error_log"
	CustomLog "/var/log/httpd/mail.fwiarda.com.access_log" combined
</VirtualHost>

# The entry for calls to http://server.fwiarda.com/ .
# It has it's own error log and access log files.
<VirtualHost "*:80">
	ServerName "server.fwiarda.com"
	DocumentRoot "/home/server/www"
	ErrorLog "/var/log/httpd/server.fwiarda.com.error_log"
	CustomLog "/var/log/httpd/server.fwiarda.com.access_log" combined
</VirtualHost>

# The entry for calls to my personal web site
# http://www.fwiarda.com/ . It has it's own document root, and it's
# own, error log and access log files.
<VirtualHost "*:80">
	ServerName "www.fwiarda.com"
	ServerAlias "fwiarda.com"
	DocumentRoot "/home/fwiarda/www"
	ErrorLog "/var/log/httpd/www.fwiarda.com.error_log"
	CustomLog "/var/log/httpd/www.fwiarda.com.access_log" combined
</VirtualHost>
The following files have been edited commenting everything out by placing a # at the beginning of each line:
/etc/httpd/conf.d/mailman.conf
/etc/httpd/conf.d/manual.conf
/etc/httpd/conf.d/mrtg.conf
/etc/httpd/conf.d/squid.conf
/etc/httpd/conf.d/squirrelmail.conf
/etc/httpd/conf.d/ssl.conf
/etc/httpd/conf.d/webalizer.conf
/etc/httpd/conf.d/welcome.conf
The document root directory, the directory containing the log files, and all the directories above them, must be searchable and readable for the user apache. To be able to test this, it practical to login as user apache. However, by default no login shell is assigned to the user apache. We fix this editing the file /etc/passwd and changing the line:
apache:x:48:48:Apache:/var/www:/sbin/nologin
into:
apache:x:48:48:Apache:/var/www:/bin/bash
When logged-in as root, we can now log-in as apache by issuing the following command:
su - apache
If there is any flaw in file access permission settings, they will become clearly noticeable.
The web site http://server.fwiarda.com/ is used for accessing the access and error logs, and the usage statistics of my server. The directory /home/server/www is the document root for this web site. It must be created, as well as sub-directories for usage statistics and a link to the directory containing the servers log files:
mkdir /home/server/www
mkdir /home/server/www/usage
mkdir /home/server/www/usage/mail.fwiarda.com
mkdir /home/server/www/usage/server.fwiarda.com
ln -s /var/log/httpd /home/server/www/log
chmod 755 /var/log/httpd
I do not want everybody to have access to my logs and usage statistics. Therefore a file /home/server/www/.htaccess is created, containing the following lines:
AuthUserFile /home/server/www/.htpasswdAuthName "Server Administrator" AuthType Basic<Limit GET POST> require valid-user </Limit>
A file /home/server/www/.htpasswd is created by issuing the following commands:
htpasswd /home/server/www/.htpasswd root
htpasswd /home/server/www/.htpasswd fwiarda
The htpasswd program prompts for the appropriate passwords.
The ownership of the /home/server/www tree shall belong to the user server. If this directory tree has been created while being logged-in as root, the ownership must be transferred with the following command:
chown -R server:server /home/server/www
For more information about the Apache web server see "Apache; The Definitive Guide" ([3]).
Webalizer is a tool for generating usage statistics for web pages. The webalizer binary and the man page has been extracted from an old CentOS 7 RMP "GeoIP-1.5.0-14.el7.x86_64.rpm" that cannot be installed on CentOS 8. See here for a copy of these files. They must be copied to "/usr/bin/webalizer" and to "/usr/share/man1/webalizer.1.gz". After copying the following command must be executed:
chmod +x /usr/bin/webalizer
In order to make the webalizer binary work, links mimicking old libraries must be created with the comands:
cd /usr/lib64
ln -s libgd.so.3.0.5 libgd.so.2
ln -s libpng16.so.16.34.0 libpng15.so.15
The file /etc/webalizer.conf is edited, to ensure the following parameters are defined or commented out:
# We will specify the log file at the command line.
# The entry LogFile is commented out.
#LogFile /var/log/httpd/access_log
# We will specify the output directory at the command line. # The entry OutputDir is commented out. #OutputDir .# The file webalizer.hist in the output directory will # contain the data for previous months. HistoryName webalizer.hist# We only process entries not yet processed before. We # retrieve the old usage information form the files # webalizer.hist and webalizer.current Incremental yes# The file webalizer.current in the output directory will # contain the data for the current month. IncrementalName webalizer.current# For debugging purposes we enable log messages. When # webalizer is called from a script, we suppres all messages # by adding the -Q option at the command line. Quiet no
A file /etc/cron.daily/webalizer is created. This file is executed daily since it resides in the /etc/cron.daily directory. It must contain the following lines:
#!/bin/bash
if [ -s /var/log/httpd/server.fwiarda.com.access_log ] ; then
	/usr/bin/webalizer -Q \
		-n server.fwiarda.com \
		-r server.fwiarda.com \
		-o /home/server/www/usage/server.fwiarda.com \
		/var/log/httpd/server.fwiarda.com.access_log
fi
if [ -s /var/log/httpd/mail.fwiarda.com.access_log ] ; then
	/usr/bin/webalizer -Q \
		-n mail.fwiarda.com \
		-r mail.fwiarda.com \
		-o /home/server/www/usage/mail.fwiarda.com \
		/var/log/httpd/mail.fwiarda.com.access_log
fi
if [ -s /var/log/httpd/www.fwiarda.com.access_log ] ; then
	/usr/bin/webalizer -Q \
		-n www.fwiarda.com \
		-r www.fwiarda.com \
		-r fwiarda.com \
		-o /home/server/www/usage/www.fwiarda.com \
		/var/log/httpd/www.fwiarda.com.access_log
fi
After editing this file must be made executable with the command:
chmod 755 /etc/cron.daily/webalizer
For more information about webalizer see Wikipedia, [11].
Squirrelmail is used for webmail.
SquirrelMail 1.4.23-svn is downloaded from the SquirrelMail website and the subdirectory squirrelmail.stable/squirrelmail from the file squirrelmail-.........tar.gz is unpacked to the directory /usr/local/share/squirrelmail.
SquirrelMail plugin tnef_decoder is downloaded from the SquirrelMail website. The downloaded file tnef_decoder-1.0-1.4.0.tar.gz is unpacked to /usr/local/share/squirrelmail/plugins.
SquirrelMail plugin abook_import_export is downloaded from the SquirrelMail website. The downloaded file abook_import_export-1.1-1.4.4.tar.gz is unpacked to /usr/local/share/squirrelmail/plugins.
The file /usr/local/share/squirrelmail/plugins/abook_import_export/config_default.php was patched changing the line:
$aie_csv_maxsize=65535;
Note that SquirrelMail crashes if the users mailbox is readable by others then the owner. So change this with:
chmod 600 /var/spool/mail/*
The SquirrelMail coniguration is moved to the "/etc" directory wih the following commands:
        mv /usr/local/share/squirrelmail/config /etc/squirrelmail
        ln -s /etc/squirrelmail /usr/local/share/squirrelmail
Directories for SquirrelMail preferences and attachements are created with the following commands:
        mkdir /etc/squirrelmail/prefs
        chown apache:apache /etc/squirrelmail/prefs
        mkdir /var/spool/squirrelmail
        mkdir /var/spool/squirrelmail/attach
        chown apache:apache /var/spool/squirrelmail/attach
The file /usr/local/share/squirrelmail/config/config.php is edited changing/adding the following lines:
        $config_location_base = '..';
        $datadir = '/etc/squirrelmail/prefs/';
        $attachmentdir = '/var/spool/squirrelmail/attach/';
        $plugins[0] = 'delete_move_next';
        $plugins[1] = 'new_mail';
        $plugins[2] = 'tnef_decoder';
        $plugins[3] = 'abook_import_export';
The file /etc/php.ini has been edited changing/adding the following lines:
        short_open_tag = Off
        max_execution_time = 3600
        memory_limit = 64M
        post_max_size = 64M
        upload_max_filesize = 64M
        max_file_uploads = 100
The file /etc/samba/smb.conf is edited and shall contain the following lines:
[global]
workgroup = fwiarda-group
netbios name = fwiarda-server
server string = Frits Wiarda's Server
encrypt passwords = yes
security = user
time service = yes
follow symlinks = yes
wide links = yes
unix extensions = no

[fwiarda]
path = /home/fwiarda
comment = /home/fwiarda
read only = no
create mask = 644
force create mode = 644
directory mask = 755
force directory mode = 755
guest ok = no
Samba uses the passwords from file /etc/smbpasswd instead of /etc/passwd or /etc/shadow. That means separate passwords for samba must be created. This is done with the following comand:
smbpasswd -a fwiarda
The smbpasswd program prompts for the appropriate password.
For more information on samba see "Using Samba" ([4]).
After running a server for some time, one will discover in the log files that hackers are trying to discover passwords by just trying out huge volumes of passwords. To make this kind of attacks more difficult it is wise not to use easy to guess passwords like regular words from the dictionary. The best passwords consist out of letters, digits and other characters.
To make brute force password hacking even more difficult, I use fail2ban. Fail2ban scans the log files for failed login attempts, and blocks a couple of hours the IP addresses from which to many failed login attempts are made. It uses the iptables command to discard all IP packets from these IP addresses. That makes my server totally unreachable from these IP addresses, stopping the attack after a few attempts.
For more information about fail2ban see Wikipedia. [12].
To be able to reach my server from the internet, the some NAT settings must me made in the FTTH modem.
The easiest option is to set the default address to which IP packages from the internet must be routed to the servers internal IP address 10.0.0.254. Now all IP packages from the internet are send to the server.
The best option is to list explicitly for which TCP and UDP ports IP packages must be routed to the servers internal IP address 10.0.0.254. Other IP packages can be discarded, making life for hackers more difficult. The ports which must be opened are:
For more information about Network Address Translation see Wikipedia [5].
| BIOS | Basic Input Output System. |
| DHCP | Dynamic Host Configuration Protocol. |
| DKIM | DomainKeys Identified Mail. |
| DMARC | Domain-based Message Authentication and Conformance. |
| DNS | Domain Name System. |
| FTP | File Transfer Protocol. |
| FTTH | Fiber To The Home. |
| GTP | GUID Partition Table. |
| HTML | HyperText Mark-up Language. |
| HTTP | HyperText Transfer Protocol. |
| HTTPS | HyperText Transfer Protocol Secure. |
| IMAP | Internet Mail Access Protocol. |
| IP | Internet Protocol. |
| IPv4 | Internet Protocol Version 4. |
| IPv6 | Internet Protocol Version 6. |
| MBR | Master Boot Record. |
| POP3 | Post Office Protocol version 3. |
| NAT | Network Address Translation. |
| RFC | Request For Comment. |
| RXD | Receive Data. |
| SMTP | Simple Mail Transfer Protocol. |
| SPF | Sender Policy Framework. |
| SSH | Secure SHell. |
| SSL | Secure Socket Layer. |
| STL | Secure Transport Layer. |
| TCP | Transmission Control Protocol. |
| TXD | Transmit Data. |
| UDP | User Datagram Protocol. |
| UEFI | Universal Extendable Firmware Interface. |
| USB | Universal Serial Bus. |
[1] DNS and BIND; Paul Albitz and Cricket Liu; O'Reilly Publishing
[2] Sendmail; Bryan Costales with Eric Alllman; O'Reilly Publishing
[3] Apache; The Definitive Guide; Ben Laurie and Peter Laurie; O'Reilly Publishing
[4] Using Samba; Jay Ts, Robert Eckstein and David Colloier-Brown; O'Reilly Publishing; Digital copy of an old edition available at http://www.samba.org/samba/docs/using_samba/toc.html
[5] Network Address Translation; Wikipedia; See https://en.wikipedia.org/wiki/Network_address_translation
[6] Cron; Wikipedia; See https://en.wikipedia.org/wiki/Cron
[7] Sender Policy Framework; Wikipedia; See https://en.wikipedia.org/wiki/Sender_Policy_Framework
[8] DomainKeys Identified Mail; Wikipedia; See https://en.wikipedia.org/wiki/DomainKeys_Identified_Mail
[9] DMARC; Wikipedia; See https://en.wikipedia.org/wiki/DMARC
[10] Apache SpamAssassin; Wikipedia; See https://en.wikipedia.org/wiki/Apache_SpamAssassin
[11] Webalizer; Wikipedia; See https://en.wikipedia.org/wiki/Webalizer
[12] Fail2ban; Wikipedia; See https://en.wikipedia.org/wiki/Fail2ban
| Home | fwiarda@fwiarda.com |